使用Python让电脑自动倒计时关机
在日常使用电脑的过程中,很多小伙伴都有让电脑定时自动关机的需求。通常而言,大家一般都会有几种选择。
假如哪一天,你女神问你,有没有什么定时关机的好方法,你怎么告诉她?
一、熟悉计算机操作的话,可以使用cmd命令
有些小伙伴比较熟悉计算机的各种操作,是一个十足的电脑通,“电脑修得好,XXX当到老”,咳咳。这一类的小伙伴基本上有了需求通过电脑操作系统本身自带的功能就可以解决。比如在让电脑自动倒计时关机这件事情上,这些小伙伴会很不屑一顾的说,直接在命令行使用shutdown命令就可以实现了。
是的,在命令行中使用shutdown命令就可以完成电脑定时自动关机的操作。shutdown命令用于处理计算机和应用程序,有非常多的使用参数,比如注销计算机可以使用命令:
shutdown /l 关闭计算机,可以使用命令:
shutdown /s 重启计算机,可以使用命令:
shurdown /r shutdown命令所有的使用参数如下图所示:

从上图可以发现我们继续使用/t参数就可以对shutdown执行的操作进行超时处理,也就是定时的操作。比如,我们需要在1分钟之后关闭计算机,那么可以使用如下命令:
shutdown /s /t 60 很简单,很快速。但是,如果经常需要操作的话就有点繁琐了,每次都需要:
- 打开命令行;
- 计算需要关机的秒数;
- 输入shutdown命令;
如果你女神问起了你,你告诉她说,先XXX键打开命令行终端,再计算转换一下什么时候需要关键,最后输入一串鬼命令……嗯,拜拜了您嘞。
二、不熟悉计算机操作、图省事使用网上的软件
如果不想每次都打开命令行终端,计算时长,输入命令,那么可以使用一些编写开发好的定时关机小软件。
这种软件在网络上一搜一大把,在某个软件下载网站上还有一个专门的定时关机软件排行,如下图所示:

这种类型的软件基本上无需安装,下载即可使用,使用起来也复杂。
但是这些小软件,要么来源不明,要么广告满天飞,要是推荐给女神使用,实在是不放心。万一弹出什么“XX直播”、“葡京赌场”之类的广告,或是诱导下载安装了某某全家桶,真是有损自己在女神心中的形象。
三、为了省事和安全,我们可以自己用Python编写
既不想女神操作麻烦,又担心网上下载的软件不靠谱,那就自己撸一个出来吧。都说Python大法好,Python用来写这种小工具助手型的软件的确是很方便。下面,我们就通过PyQt5编写一个简单的定时自动关机小助手。
核心代码
在很多场合,我们都听说过所谓的二八定律,百分之二十的部分,占了百分之八十的效用。在这个定时关机小助手中,可能也存在于这种定律。
使用Python进行定时关机的最核心代码,是使用Python的内置库subprocess来执行shutdown命令,其代码为:
subprocess.call("shutdown /p") 当然我们的定时关机小助手不可能就这么一行代码,那还不如让女神直接在命令行终端用shutdown命令呢。
为了将这一行核心代码,包装得易用和简便,我们需要使用PyQt5这个图形界面框架编写一个壳出来,将定时关机的代码包装起来。
图形界面
首先,我们通过QMainWindow创建一个基本的图形界面:
# coding:utf-8 from PyQt5 import QtWidgets,QtGui,QtCore import sys import datetime import subprocess ''' 自动关机小工具 ''' class MainUi(QtWidgets.QMainWindow): def __init__(self,parent=None): super().__init__() self.init_ui() self.timer_status = False def init_ui(self): self.setWindowTitle('自动关机助手 - 州的先生zmister.com') # 窗口标题 self.setFixedSize(500, 350) # 窗口初始大小 def main(): app = QtWidgets.QApplication(sys.argv) gui = MainUi() gui.show() sys.exit(app.exec_()) if __name__ == '__main__': main() 这段代码呈现出来的界面如下图所示:

接着,我们在对这个界面设置图标,并使用网格布局QGridLayout()添加两个部件,在上方的网格中通过QLabel()添加当前的时间,倒计时时间和QPushbutton()设置一个图片LOGO按钮,在下方网格中使用QTabWidget()创建选项卡部件:
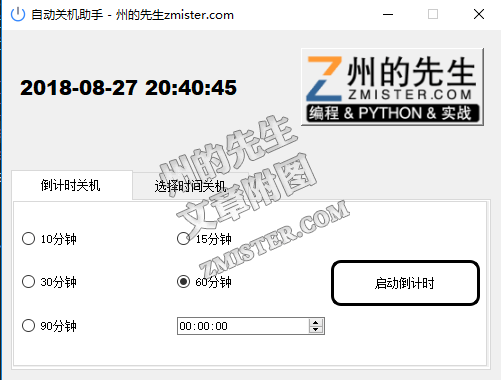
# 设置图标 icon = QtGui.QIcon() icon.addPixmap(QtGui.QPixmap("gj.png"), QtGui.QIcon.Normal, QtGui.QIcon.Off) self.setWindowIcon(icon) # 主窗口部件 self.main_widget = QtWidgets.QWidget() # 实例化一个QWidget部件,作为主窗口的部件 self.main_widget.setObjectName('main_widget') self.main_layout = QtWidgets.QGridLayout() # 创建一个网格布局 self.main_widget.setLayout(self.main_layout) # 设置主部件的布局为网格布局 self.setStyleSheet(''' #datetime_label{ font-size:20px; font-weight:700; font-family: "Helvetica Neue", Helvetica, Arial, sans-serif; } #at_icon{ background-image: url(./alogo.png); width:175px; height:70px; } #start_timer,#start_time{ width:40px; height:40px; border:3px solid black; border-radius:10px } #timer_custom_input{ width:5px; } #timer_lable{ color:red; font-size:16px; font-weight:700; font-family: "Helvetica Neue", Helvetica, Arial, sans-serif; } QTabBar::tab{ min-width:40ex; min-height:10ex; } ''') # 两个子部件 self.widget_top = QtWidgets.QWidget() # 上方部件 self.widget_top_layout = QtWidgets.QGridLayout() # 创建一个网格布局 self.widget_top.setLayout(self.widget_top_layout) # 设置widget_top布局为网格布局 self.datetime_label = QtWidgets.QLabel() # 创建一个日期时间文本 self.datetime_label.setObjectName('datetime_label') self.datetime_label.setText(datetime.datetime.strftime(datetime.datetime.today(),"%Y-%m-%d %H:%M:%S")) # 设置文本内容为当前时间 self.timer_lable = QtWidgets.QLabel() # 倒计时文本 self.timer_lable.setObjectName('timer_lable') self.shutdown_lable = QtWidgets.QLabel() # 用于显示关机时间 # 图片按钮 self.attention_img = QtWidgets.QPushButton() # 创建一个按钮 self.attention_img.setObjectName('at_icon') # 将小部件添加到上层布局中 self.widget_top_layout.addWidget(self.datetime_label,0,0,1,3) self.widget_top_layout.addWidget(self.timer_lable, 1, 0, 1, 3) self.widget_top_layout.addWidget(self.attention_img,0,4) self.widget_bottom = QtWidgets.QTabWidget() # 下方选项卡部件 # 倒计时自动关机 self.timer_tab = QtWidgets.QTabWidget() # 创建一个选项卡 self.timer_tab_layout = QtWidgets.QGridLayout() # 创建一个网格布局 self.timer_tab.setLayout(self.timer_tab_layout) # 设置选项卡布局为网格 self.timer_10 = QtWidgets.QRadioButton("10分钟") # 创建单选按钮 self.timer_10.setObjectName('timer_button') self.timer_15 = QtWidgets.QRadioButton("15分钟") self.timer_10.setObjectName('timer_button') self.timer_30 = QtWidgets.QRadioButton("30分钟") self.timer_60 = QtWidgets.QRadioButton("60分钟") self.timer_60.setChecked(True) # 设置为默认选中 self.timer_90 = QtWidgets.QRadioButton("90分钟") self.timer_custom = QtWidgets.QTimeEdit() # 时间选择输入框 self.timer_custom.setDisplayFormat("HH:mm:ss") # 设置时间选择框格式 self.timer_shutdown = QtWidgets.QPushButton("启动倒计时") self.timer_shutdown.setObjectName("start_timer") self.timer_tab_layout.addWidget(self.timer_10,0,0) self.timer_tab_layout.addWidget(self.timer_15, 0, 1) self.timer_tab_layout.addWidget(self.timer_30, 1, 0) self.timer_tab_layout.addWidget(self.timer_60, 1, 1) self.timer_tab_layout.addWidget(self.timer_90, 2, 0) self.timer_tab_layout.addWidget(self.timer_custom, 2, 1,1,1) self.timer_tab_layout.addWidget(self.timer_shutdown, 0, 3,3,1) # 选择日期时间进行关机 self.sletime_tab = QtWidgets.QTabWidget() self.sletime_tab_layout = QtWidgets.QGridLayout() self.sletime_tab.setLayout(self.sletime_tab_layout) self.time_custom = QtWidgets.QDateTimeEdit() # 选择时间关机 self.time_custom.setDateTime(datetime.datetime.today()) self.time_custom.setDisplayFormat("yyyy-MM-dd HH:mm:ss") # 设置时间选择框格式 self.time_shutdown = QtWidgets.QPushButton("指定时间关机") self.time_shutdown.setObjectName('start_time') self.sletime_tab_layout.addWidget(self.time_custom,0,0,1,2) self.sletime_tab_layout.addWidget(self.time_shutdown,0,2,1,1) self.widget_bottom.addTab(self.timer_tab,"倒计时关机") self.widget_bottom.addTab(self.sletime_tab,"选择时间关机") self.main_layout.addWidget(self.widget_top,0,0,1,1) self.main_layout.addWidget(self.widget_bottom, 1, 0, 2, 0) self.setCentralWidget(self.main_widget) # 设置UI核心部件为main_widget 这样,我们的图形界面的样子就和下图一样了:
但是现在界面上显示的当前时间只是程序启动时的时间,并不会实时的变化,接下来我们来实现界面上当前时间的实时变化。
在MainUi()新建一个方法,用于设置self.datetime_label的文本:
# 实时显示当前时间 def show_datetime_slots(self): self.datetime_label.setText(datetime.datetime.strftime(datetime.datetime.today(),"%Y-%m-%d %H:%M:%S")) 然后,在init_ui()方法中创建一个计时器,设置计时器间隔1秒,将计时器绑定到show_datetime_slots()方法上,并启动计时器:
# 实时时间计时器 self.datetime = QtCore.QTimer() # 实例化一个计时器 self.datetime.setInterval(1000) # 设置计时器间隔1秒 self.datetime.start() # 启动计时器 self.datetime.timeout.connect(self.show_datetime_slots) # 计时器连接到槽函数更新UI界面时间 完成了这两步,我们的图形界面中的时间就可以实时变化了:

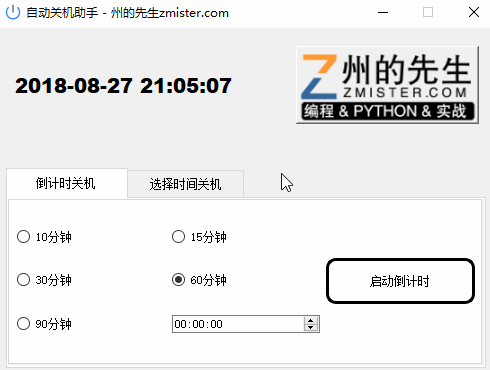
接下来,处理按钮的操作,当我们点击按钮时,获取所选择或设置的时间值,所有的单选按钮和时间选择框都禁用,同时启动新创建的计时器self.timer_time,用于倒计时,倒计时结束后,连接到槽函数上:
# 实时显示倒计时 def show_timer_slots(self): try: if self.secound == 0: self.timer_time.stop() subprocess.call("shutdown /p") else: self.secound -= 1 m, s = divmod(self.secound, 60) h, m = divmod(m, 60) print("%02d:%02d:%02d" % (h, m, s)) self.timer_lable.setText("倒计时:%02d:%02d:%02d 请妥善保存文件" % (h, m, s)) except Exception as e: print(repr(e)) # 启动倒计时关机 def start_timer_shutdown(self): if self.timer_status is False: self.timer_status = True self.timer_shutdown.setText("停止倒计时") self.timer_10.setEnabled(False) self.timer_15.setEnabled(False) self.timer_30.setEnabled(False) self.timer_60.setEnabled(False) self.timer_90.setEnabled(False) self.timer_custom.setEnabled(False) self.time_custom.setEnabled(False) self.time_shutdown.setEnabled(False) if self.timer_custom.text() != '00:00:00': print("使用自定义时间") h, m, s = self.timer_custom.text().strip().split(":") self.secound = int(h) * 3600 + int(m) * 60 + int(s) else: print("使用预设时间") if self.timer_10.isChecked() is True: self.secound = int(self.timer_10.text()[:2]) * 60 elif self.timer_15.isChecked() is True: self.secound = int(self.timer_15.text()[:2]) * 60 elif self.timer_30.isChecked() is True: self.secound = int(self.timer_30.text()[:2]) * 60 elif self.timer_60.isChecked() is True: self.secound = int(self.timer_60.text()[:2]) * 60 elif self.timer_90.isChecked() is True: self.secound = int(self.timer_90.text()[:2]) * 60 self.timer_time.start() self.timer_time.timeout.connect(self.show_timer_slots) # 计时器连接到槽函数更新UI界面时间 else: self.timer_status = False self.timer_shutdown.setText("开启倒计时") self.timer_time.stop() # 停止倒计时计时器 self.timer_lable.setText("倒计时已停止!") # 重新启用选择 self.timer_10.setEnabled(True) self.timer_15.setEnabled(True) self.timer_30.setEnabled(True) self.timer_60.setEnabled(True) self.timer_90.setEnabled(True) self.timer_custom.setEnabled(True) self.time_custom.setEnabled(True) self.time_shutdown.setEnabled(True) # 启动指定时间关机 def start_time_shutdown(self): if self.timer_status is False: self.timer_status = True self.time_shutdown.setText("停止倒计时!") self.timer_10.setEnabled(False) self.timer_15.setEnabled(False) self.timer_30.setEnabled(False) self.timer_60.setEnabled(False) self.timer_90.setEnabled(False) self.timer_custom.setEnabled(False) self.time_custom.setEnabled(False) self.timer_shutdown.setEnabled(False) set_time = datetime.datetime.strptime(self.time_custom.text(),"%Y-%m-%d %H:%M:%S") # 还原设定时间的时间形式 print(self.time_custom.text()) time_delta = (set_time - datetime.datetime.today()).total_seconds() # 计算时间差的总秒数 print(time_delta) if int(time_delta) > 0: self.secound = time_delta self.timer_time.start() # 启动倒计时计时器 self.timer_time.timeout.connect(self.show_timer_slots) # 计时器连接到槽函数更新UI界面时间 else: self.timer_status = False self.time_shutdown.setText("指定时间关机") self.timer_time.stop() # 停止倒计时计时器 self.timer_lable.setText("倒计时已停止!") # 重新启用选择 self.timer_10.setEnabled(True) self.timer_15.setEnabled(True) self.timer_30.setEnabled(True) self.timer_60.setEnabled(True) self.timer_90.setEnabled(True) self.timer_custom.setEnabled(True) self.time_custom.setEnabled(True) self.timer_shutdown.setEnabled(True) 这样,当我们选择了一个倒计时,并点击启动按钮后,图形界面上会出现倒计时的提醒,并且所有的选择项都被禁用了,如下动图所示:
打包EXE
程序编写好了,使用Pyinstaller等工具将其打包成EXE文件,就可以妥妥的交给女神使用。在这里,小州君使用的是Pyinstaller 3.4开发版。
在打包之前,我们需要对代码中引用的图片文件进行一下处理,避免打包后的程序索引不到图片。
在这个程序中,我们一共使用了两个图片,一个是图形界面的小图标,一个是图形界面右上角的大LOGO,我们为这两个图片创建一个QRC文件,文件名为img.qrc,内容为:
<RCC> <qresource prefix="/" > <file>gj.png</file> <file>alogo.png</file> </qresource> </RCC> 然后在img.qrc文件同级目录下,打开命令行,输入一下命令:
pyrcc5 img.qrc -o imgs.py 执行命令,在当前目录下会生成一个名为imgs.py的python文件,里面包含了我们定义的图片的base64编码内容。
接着在程序的代码中引入这个文件:
import imgs 同时修改图片的使用方式,将图片的路径前加冒号:,如下所示:
小图标:
icon.addPixmap(QtGui.QPixmap(":gj.png"), QtGui.QIcon.Normal, QtGui.QIcon.Off) 大logo:
background-image: url(:alogo.png); 完成了这一步,就可以使用Pyinstaller对程序进行打包了。在文件目录下,我们打开命令行终端,在其中输入命令:
pyinstaller -F -w --icon favicon.ico xxx.py 其中:
– -F:表示将程序打包为一个EXE文件;
– -w:表示不带默认的控制台;
– –ico:用来指定生成的EXE文件的图标;
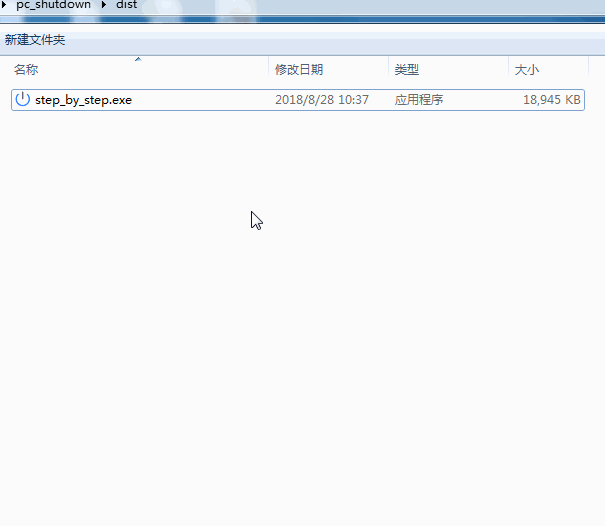
最后执行命令,成功之后,我们的文件夹下会多出两个子文件夹:build和dist,其中打包好的EXE程序就在dist文件夹内:

打开EXE文件文件,程序运行一切正常:
这样,我们使用Python编写的定时自动关机助手就搞定了。
有需要源文件和EXE文件的小伙伴,可以关注微信公众号:州的先生,回复关键词“0012”获取。
欢迎留言讨论!